

We’ve all gotten those messages in our inbox that seem authentic, only to discover upon further inspection that the sender is trying to trick us into giving up our personal information. This is known in the internet security world as phishing, and it’s been a big problem for a while now. As we’ve discussed in past blogs about internet security (and phishing in specific: read here and here), while there is no 100% foolproof way to stop the bad guys, there are numerous ways to try to counteract their behavior. Multifactor authentication, security training for all users. etc. Another method we recently adopted here at CGNET, and encourage our customers to consider as well, is the use of an External Sender Warning in Outlook 365. Essentially, it catches the perpetrators in the act.
So how does it work?
The External Sender Warning in Outlook identifies a message as originating from outside of the organization, right there in the preview pane. So when you get that message that appears to be from the boss — offering to give you a big bonus if you could please just send him your bank account number, mother’s maiden name and rights to your first-born child — a warning will appear at the top of the text section of the message, visible in preview. This gives you an immediate visual queue that this message is actually coming from an outside source. Therefore, it clearly cannot be from your boss, and the chances of it being a phishing message are likely 100%.
Easy steps to safety
It’s a pretty straightforward process to set up the warning in the Exchange Admin account and customize it to your liking. Here’s how:
- Log in to your Admin account.
- Select Admin from your list of Apps.
- Then select Admin centers > Exchange (located on the left-side menu)
- Select mail flow (left side menu).
- Select the + icon > Create a new rule…
- Create a name for the rule (Ex: External message warning).
- For *Apply this rule if… Select “The sender is located…”, then choose “Outside the organization”.
- Select “More options…” at the bottom of the new rule window.
- Select “Add condition” > “The recipient is..” > “External/Internal” > then choose “Inside the Organization”.
- For *Do the following… , select “Apply a disclaimer to the message…” , “prepend a disclaimer”.
- Select *Enter text.
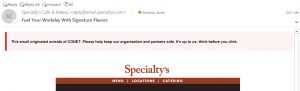
- Enter the message you want to prepend to inbound external emails. Microsoft recommends you keep it fairly short so that it fits in the preview window. Here’s what our warning at CGNET looks like:
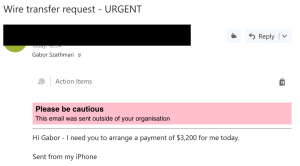
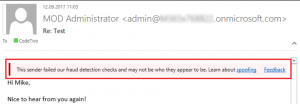
And here are a couple of examples from others; you can pretty much customize the disclaimer to say whatever you want it to:
- After entering the desired text, you’ll need to specify the fall back action (by clicking “*Select one…”). Choose Wrap, then “OK”.
- Scroll down and set the Priority level according to any other rules you have configured. If this is the only rule, you can set this to “0”.
- Click Save.
That’s it! You should start seeing the warning on external emails within minutes.
In the prophetic words of Aretha Franklin…
It’s a quick and easy solution to get people to THINK before acting upon a request, and really a constant reminder to be on their toes when it comes to the security of their — and your organization’s — private information.


0 Comments